2 - How to remove a VLAN from a Switch#
Mistakes happen, especially when you’re learning. If you’ve accidentally added the wrong VLAN to a Cisco switch in Packet Tracer, don’t worry. In this tutorial, we’ll walk you through how to remove a VLAN that you no longer need.
Step 1 – Access the Switch CLI#
First, click on the switch in your topology.
Then:
Select the CLI tab
Press
Enterto get to the switch prompt
You should now see something like:
Switch>
Step 2 – Enter Privileged EXEC Mode#
Before you can make changes, enter privileged mode:
enable
The prompt should change to:
Switch#
Step 3 – Enter Global Configuration Mode#
Type the following:
configure terminal
Tip
You can also use the shorthand conf t to enter global configuration mode.
Now you’re in global config mode:
Switch(config)#
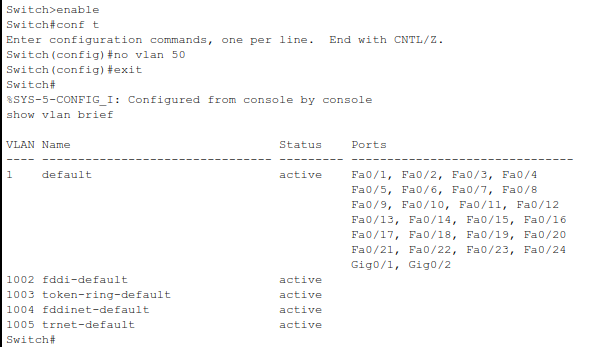
Step 4 – Remove the VLAN#
Let’s say you accidentally created VLAN 50. Which we’ve simulated in this example.
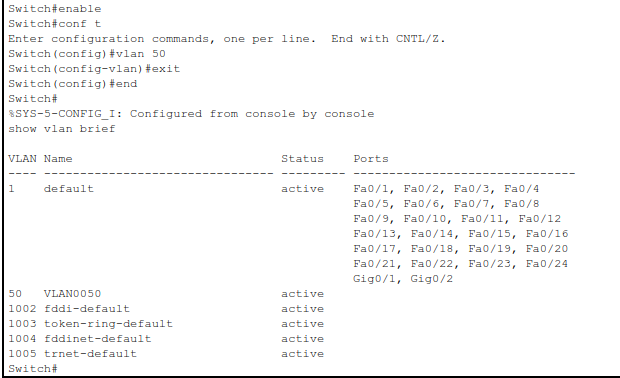
To remove it, type (make sure you’re still in global config mode):
no vlan 50
Important
Make sure to replace 50 with the actual VLAN number you want to remove. You can always use show vlan brief to check existing VLANs.
This deletes VLAN 50 from the VLAN database.
Summary#
Removing a VLAN from a Cisco switch is straightforward once you know the commands. Use no vlan [number] to delete unwanted VLANs and keep your configuration clean.